In this tutorial we’ll see how to debug Niryo One motors, one at a time. You may have some problems with your robot, and those problems may be related to a specific motor.
Some reasons why you may want to debug motors one by one :
- You have a “Motor connection problem” in Niryo One Studio. Along with this error, you’ll get a more detailed message telling you which motor (or which motor bus) is not connected.
- One or more Dynamixel motors often reboot (you’ll see the motor LED switch to red for a second).
- The robot makes weird movements and you don’t know whether it comes from motors or some mechanical parts.
- …
There are two ways of debugging each motor separately: using Niryo One Studio, or directly using ssh to connect to the Raspberry Pi 3B and change the config files. Note that the 2 ways produce the exact same result.
Method 1: Debug motors using Niryo One Studio
Make sure your Niryo One Studio is v2.1.0 minimum.
Open Niryo One Studio and go to the “Debug” tab, where you see a “Motor debug options” panel.
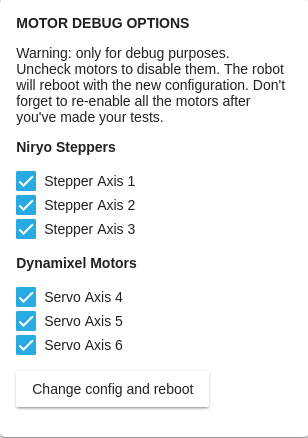
Simply check or uncheck the boxes to choose which motor to enable/disable. After you have chosen your configuration, click on “Change config and reboot”. This will make the robot reboot with only the checked motors enabled. Other motors (axis) will be in simulation mode.
Once you have detected a problem with a motor, you can check on our forum to see if someone already had the the same problem.
You can also send us a technical support message (please describe the tests you’ve made and include the log that you see on the screen) and we’ll see what we can do for you.
!!! Don’t forget to re-enable all the motors after you’re done with your tests !!!
Method 2: Debug motors directly on the Raspberry Pi (for developers)
This method is the same as method 1. It’s just a little bit faster because you can restart the execution of the Niryo One stack without restarting the Raspberry Pi 3B.
Procedure to follow for each test
First you’ll need to get access to the Raspberry Pi 3B inside the robot, via an ssh connection. (Here‘s a tutorial for that)
Now, for each test you make, you need to do this :
- Stop the current Niryo One ROS program (sudo systemctl stop niryo_one_ros.service, password for sudo : “robotics”) or kill the current ROS if you launched it manually in a terminal
- Do the required modifications on the config files
- Launch Niryo One ROS program again in a terminal so you can see the logs : roslaunch niryo_one_bringup rpi_setup.launch
Disable one motor bus completely
Vim and nano are installed on the Raspberry Pi 3B (Xubuntu version for RPi). You can use any text editor you want to modify the files.
You have 2 possibilities when debugging the motors : you can either disable one motor at a time, or disable the complete motor bus. We’ll see first how to disable a motor bus completely.
Go into the file ~/catkin_ws/src/niryo_one_bringup/launch/controllers.launch (file on github)
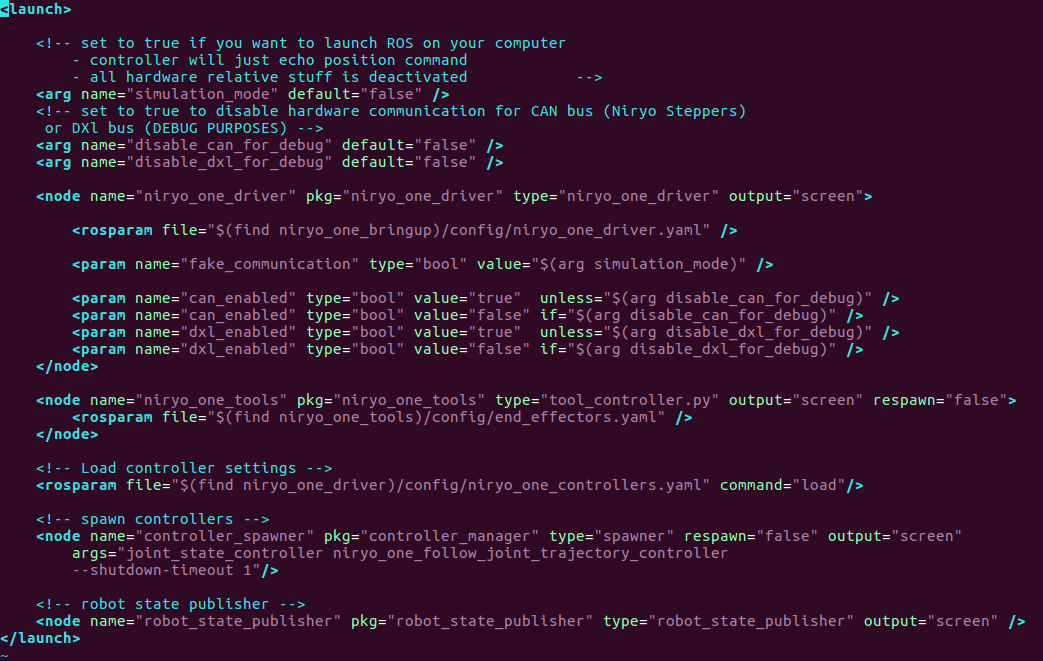
Here you’ll see those 3 lines :
- To launch the robot in simulation mode (no motor at all), just change the simulation_mode flag to true.
- To launch the robot with only the Stepper motors (axis 1, 2 & 3), change the disable_dxl_for_debug flag to true.
- And to launch the robot with only the Dynamixel motors (axis 4, 5, 6 & tools), change the disable_can_for_debug flag to true.
For each test, remember to follow the procedure given earlier to stop/modify/start the Niryo One ROS program.
If you have some problems about motors and you are not sure from where it’s coming, those tests will allow you to quickly detect if you have a Niryo Stepper problem (can bus) or a Dynamixel problem (dxl bus). You can also completely disable one motor bus if you are making tests only on the other motor bus.
After you’ve made those tests, you can start to debug one motor at a time.
Debug stepper motors
To debug those motors, don’t forget to set the simulation_mode to false in controllers.launch, and to set the disable_can_for_debug to false. Depending on what you want to do, you can leave the disable_dxl_for_debug flag to false, or set it to true.
Now, to debug one motor at a time, you’ll need to modify the file ~/catkin_ws/src/niryo_one_bringup/config/v2/niryo_one_motors.yaml (file on github) (choose the V1 or V2 folder depending on the hardware version you have. Note : if the axis 4 motor is a Dynamixel motor, you have the V2)

On this file you’ll see all the motors that should be connected to the motor bus. For this part (stepper motors), the ones that we’ll pay attention to are the motors under “can_required_motors”. If a motor ID is on this list, and the motor is not detected, you’ll get a “Motor connection problem” on Niryo One Studio.
You can simply add a # before a motor to disabling it. For example, if you put a # in front of every motor but motor 1, then only motor 1 will be running, all the other ones will be in simulation mode.
With those tests, it will be easier for you to check if a stepper motor is faulty.
After you’ve made all the tests, don’t forget to remove the comment # before the motors.
Debug Dynamixel motors
To debug those motors, don’t forget to set the simulation_mode to false in controllers.launch, and to set the disable_dxl_for_debug to false. Depending on what you want to do, you can leave the disable_can_for_debug flag to false, or set it to true.
You can now follow the same instructions as for Stepper motors, but this time you’ll modify the lines below “dxl_required_motors”.
Note : you don’t need to modify anything below “dxl_authorized_motors”.
After you’ve made all the tests, don’t forget to remove the comments # before the motors that you’ve disabled.
So now you know which motor has a problem
If you’ve spotted a problem, you can check on our forum to see if someone already had the the same problem, or send us a technical support message with the log that you got.