PHN0eWxlPgouZGlzY2xhaW1lciB7CmJhY2tncm91bmQ6I2U3ZjJmYTsKICAgIGxpbmUtaGVpZ2h0OiAyNHB4OwogICAgbWFyZ2luLWJvdHRvbTogMjRweDsKICAgICAgYm9yZGVyLXJhZGl1czogMTBweDsKICAgIG92ZXJmbG93OiBoaWRkZW47CiAgICBib3gtc2hhZG93OiAwIDAgMTBweCByZ2IoMCAwIDAgLyAzMCUpOwogIGZvbnQtZmFtaWx5OiBvcGVuLXNhbnMsIGhlbHZldGljYSwgc2Fucy1zZXJpZjsKfQouZGlzLXRpdGxlIHsKYmFja2dyb3VuZDojNmFiMGRlOwogIGZvbnQtd2VpZ2h0OiA3MDA7CiAgICBkaXNwbGF5OiBibG9jazsKICAgIGNvbG9yOiAjZmZmOwogICAgYmFja2dyb3VuZDogIzZhYjBkZTsKICAgIHBhZGRpbmc6IDZweCAxMnB4Owp9Ci5kaXMtdGV4dCB7CiAgICBwYWRkaW5nOiA2cHggMTJweDsKfQouZGlzLXRleHQgYSB7CnRleHQtZGVjb3JhdGlvbjogdW5kZXJsaW5lICFpbXBvcnRhbnQ7Cn0KPC9zdHlsZT4KPGRpdiBjbGFzcz0iZGlzY2xhaW1lciI+CjxkaXYgY2xhc3M9ImRpcy10aXRsZSI+Tm90ZTwvZGl2Pgo8ZGl2IGNsYXNzPSJkaXMtdGV4dCI+VGhpcyB0dXRvcmlhbCBpcyBkZXNpZ25lZCBmb3IgTmlyeW8gT25lIHVzZXJzLiBJZiB5b3UgYXJlIHVzaW5nIE5lZCwgcGxlYXNlIGZpbmQgdGhlIG5ldyB0dXRvcmlhbCA8YSBocmVmPSJodHRwczovL2RvY3MubmlyeW8uY29tL2FwcGxpY2F0aW9ucy9uZWQvc291cmNlL3R1dG9yaWFscy9zZXR1cF9jb25uZWN0X25lZF9ldGhlcm5ldC5odG1sIiB0YXJnZXQ9Il9ibGFuayI+aGVyZTwvYT4uPC9kaXY+CjwvZGl2Pg==
If you read this, maybe you’ve tried to connect your computer to Niryo One with an Ethernet cable.
On Windows, everything should work correctly (magic!). But from a Ubuntu PC you might have some issues with your computer not finding the robot on the network.
The Raspberry Pi inside Niryo One is configured with a static address (169.254.200.200), and if your Ubuntu is configured with DHCP it might not work.
Here’s what to do:
Change your Wired Settings
On your computer, open your Wired Settings and go into the preferences menu.
On the IPv4 tab, change from “Automatic (DHCP)” to “Manual” and follow the instructions from the screenshot below.
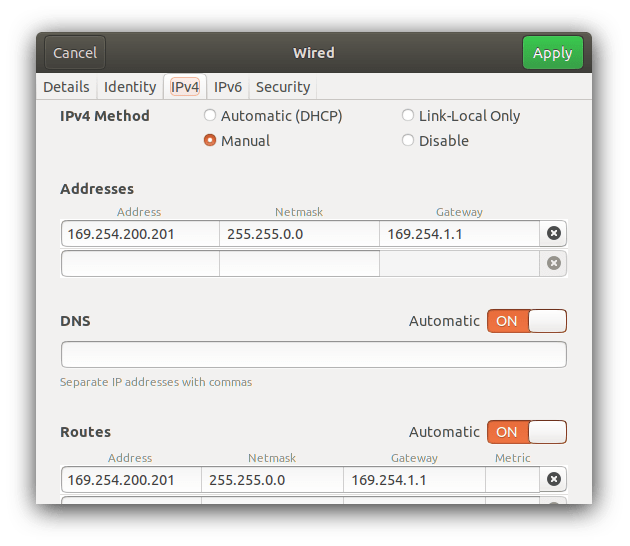
You can change the “200.201” part of the IP address if you want (just don’t use “200.200” which is the Niryo One IP address).
Once you’ve saved those settings, restart your Wired connection and plug the Ethernet cable between your PC and Niryo One.
Connect to Niryo One
Open a terminal and run ping 169.254.200.200, it should work and you can now connect to the robot!
Note: after you’re done with Niryo One and Ethernet, don’t forget to switch back to DHCP if you’re using the Ethernet port to get access to Internet from your home/office rooter.