PHN0eWxlPgouZGlzY2xhaW1lciB7CmJhY2tncm91bmQ6I2U3ZjJmYTsKICAgIGxpbmUtaGVpZ2h0OiAyNHB4OwogICAgbWFyZ2luLWJvdHRvbTogMjRweDsKICAgICAgYm9yZGVyLXJhZGl1czogMTBweDsKICAgIG92ZXJmbG93OiBoaWRkZW47CiAgICBib3gtc2hhZG93OiAwIDAgMTBweCByZ2IoMCAwIDAgLyAzMCUpOwogIGZvbnQtZmFtaWx5OiBvcGVuLXNhbnMsIGhlbHZldGljYSwgc2Fucy1zZXJpZjsKfQouZGlzLXRpdGxlIHsKYmFja2dyb3VuZDojNmFiMGRlOwogIGZvbnQtd2VpZ2h0OiA3MDA7CiAgICBkaXNwbGF5OiBibG9jazsKICAgIGNvbG9yOiAjZmZmOwogICAgYmFja2dyb3VuZDogIzZhYjBkZTsKICAgIHBhZGRpbmc6IDZweCAxMnB4Owp9Ci5kaXMtdGV4dCB7CiAgICBwYWRkaW5nOiA2cHggMTJweDsKfQouZGlzLXRleHQgYSB7CnRleHQtZGVjb3JhdGlvbjogdW5kZXJsaW5lICFpbXBvcnRhbnQ7Cn0KPC9zdHlsZT4KPGRpdiBjbGFzcz0iZGlzY2xhaW1lciI+CjxkaXYgY2xhc3M9ImRpcy10aXRsZSI+Tm90ZTwvZGl2Pgo8ZGl2IGNsYXNzPSJkaXMtdGV4dCI+VGhpcyB0dXRvcmlhbCBpcyBkZXNpZ25lZCBmb3IgTmlyeW8gT25lIHVzZXJzLiBJZiB5b3UgYXJlIHVzaW5nIE5lZCwgcGxlYXNlIGZpbmQgdGhlIG5ldyB0dXRvcmlhbCA8YSBocmVmPSJodHRwczovL2RvY3MubmlyeW8uY29tL2FwcGxpY2F0aW9ucy9uZWQvc291cmNlL3R1dG9yaWFscy9jb250cm9sX25lZF9hcmR1aW5vLmh0bWwiIHRhcmdldD0iX2JsYW5rIj5oZXJlPC9hPi48L2Rpdj4KPC9kaXY+
There are endless programming activities you can do with Niryo One. Programming the robot from an Arduino board is one of those. In this tutorial we’ll go through a real life example to show you how to do that.
The concept
Using an Arduino board along with one (or many) Niryo One will allow you to create more complex applications. For example, you can easily setup a small assembly line demo with just one Arduino and 2 robots.
Let’s just start with one Arduino and one robot.
The concept is simple : the Arduino board is the Master which decides which robot does what. It received data from sensors or user input, and sends different commands to the robots via digital pins. To start a command on a robot, the Arduino will send a digital signal. It will have to wait for a response (another digital signal on another pin) to know that the robot has finished.
Each robot is a slave. It has some predefined set of commands, and wait for the Arduino to send it a digital signal. Upon reception of the signal, a given command is started, and once finished, the robot will send another digital signal to the Arduino, to notify it has finish the command execution.
Electrical setup
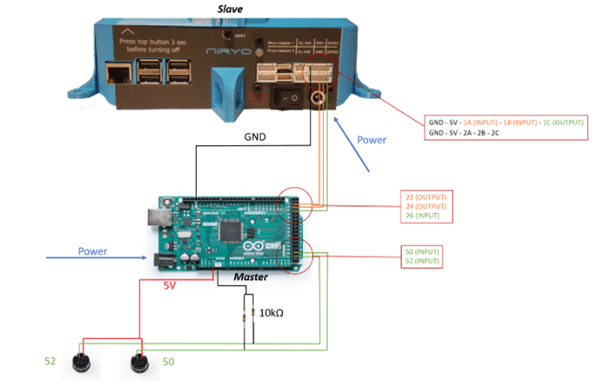
Before powering anything on, make sure that the robot and the Arduino share a common ground (black wire).
Then, you can plug up to 6 wires on the 6 digital pins at the back of the robot. On the Arduino, plug those wires on digital pins. You will then have to choose which pins are set as INPUT and OUTPUT. (Choose appropriate colors to avoid mistakes in the future)
In this example, we are using 3 wires : 2 for sending commands from the Arduino to the robot (Arduino : OUTPUT, robot : INPUT), and 1 for sending back the command execution confirmation (Arduino : INPUT, robot : OUTPUT). You will need to remember what you chose in the setup for writing the code of the application.
We’ve also added 2 buttons with 10kOhm pull-down resistors, so the user will be able to choose to execute the action “pick”, or “place”.
Programming the robot with Niryo Blocks (Niryo One Studio)
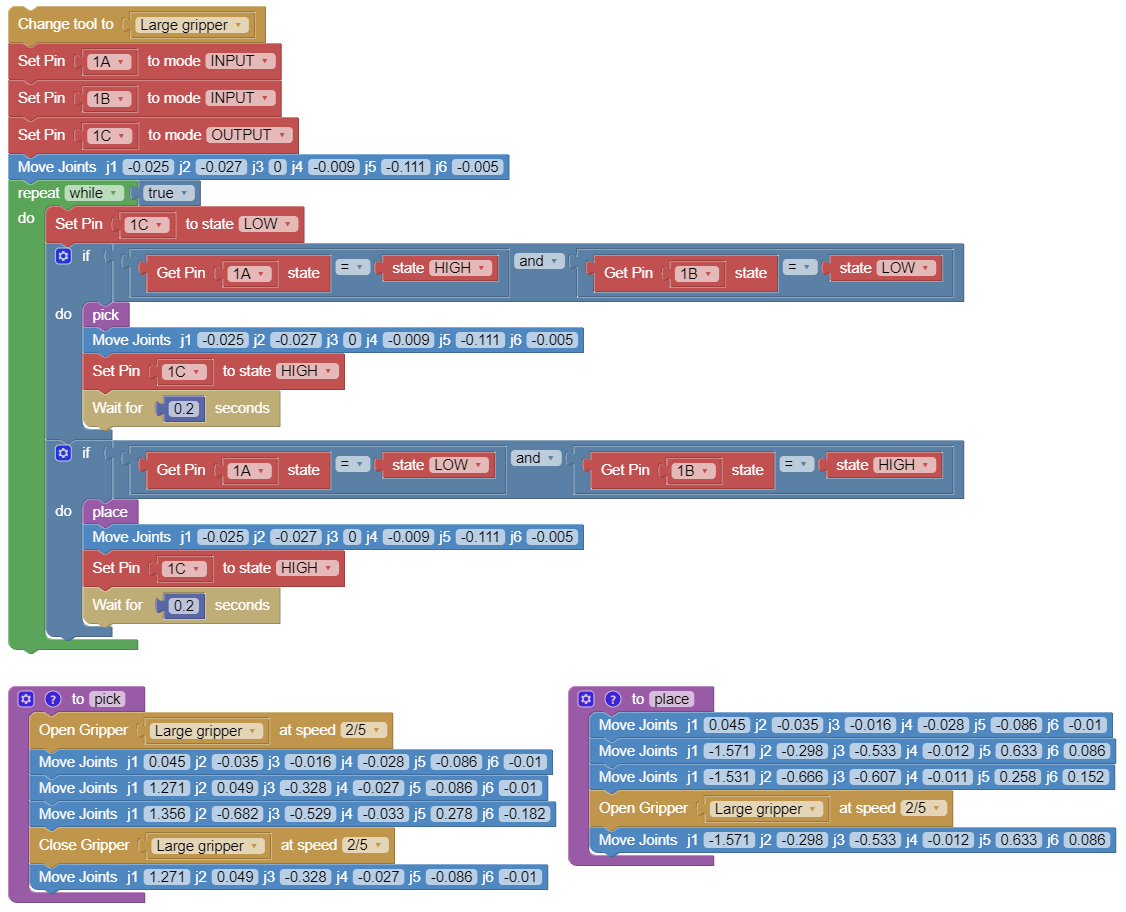
In this example, we define 2 functions, “Pick” and “Place”. The “Pick” function will pick an object (using the large gripper) on the left of the robot, and the “Place” function will place the object on the right of the robot.
First, we set the pins 1A and 1B as INPUT, to receive a signal from the Arduino. The pin 1C is set as OUTPUT, to send a signal back upon command completion.
We then add an infinite loop reading the 2 pins set as INPUT. If one pin receives a HIGH signal, the associated command will be started. At the end of the command, the pin set as OUTPUT on the robot will send a HIGH signal for 0.2 seconds (so the Arduino has the time to process it) and then set it back to LOW.
You can download the XML used to create this sequence. All you need to do is to import this sequence in the Niryo Blocks tab of Niryo One Studio, and run the sequence on the robot.
The Arduino code
Download the Arduino code here.
Going further
What you’ve seen here is the foundation for programming Niryo One robots with Arduino boards. You can easily scale the application with more robots, more Arduinos, more sensors, more buttons, etc…
The Niryo Block structure you’ve seen here will be pretty much the same : a loop that waits for a signal from the Arduino board, executes a command, and sends back a response.
Now, with your imagination (and a little bit of work), you could create some nice applications. Just a few ideas
- Tic tac toe : robot vs human
- Assembly line that separates objects depending on their weight (along with a connected Arduino-balance)
- Robot gives chocolate to the user when the user presses a button
- …
If you build a nice application with Niryo One and Arduino (or any other electrical board), feel free to share it with the Niryo community on the social networks with #niryo. We’d be glad to feature your project 🙂