


In industrial automation with Ned2 robot, the goal is not only to teach students how to program a programmable logic controller, or PLC. They also need to understand how a PLC controls, coordinates, and synchronizes several devices within an automated production line.
This includes robots, conveyors, sensors, actuators, and I/O interfaces. In the real world, these devices never work in isolation. They interact as part of a complete automation system.
Why Teach Industrial Automation with Ned2 Robot?
Students cannot master industrial automation through theory alone. Diagrams, PLC programming software, and simulators are useful. However, they cannot replace the observation of a physical system in motion.
Students need to see how one event triggers another. A sensor detects a part. The conveyor stops. The PLC validates a condition. The robot receives a command. Then the cycle starts again.
Using the Ned2 robot and the accessories included in the Automation Pack makes these interactions visible. Students understand the role of inputs, outputs, machine states, timers, and transitions.
This hands-on approach gives real meaning to PLC programming. A variable is no longer an abstract value. It becomes a signal that triggers a real action on real equipment.
Physical automation labs also help students learn from errors. Why does the cycle not start?, Why is the robot waiting for a signal? or Why does the conveyor remain stopped?
Being able to observe, understand, and troubleshoot these issues on a tangible system is far more effective than working only with a digital simulation.
With the Automation Pack, instructors can build a modular ecosystem that connects easily to their existing equipment. It helps them build progressive lab activities, from simple sequences to more advanced scenarios with sensors, conditions, and third-party devices.
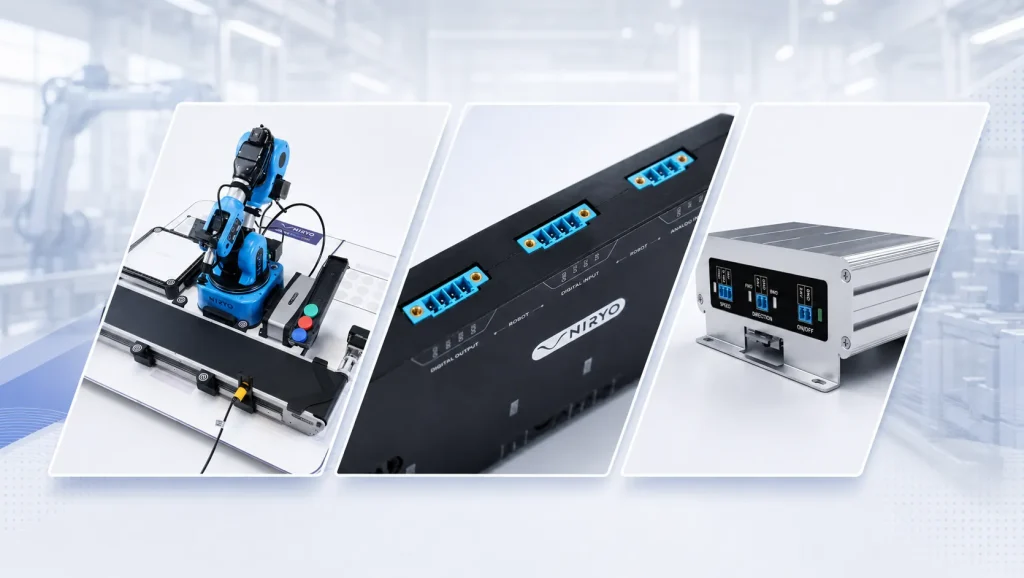
The Automation Pack includes the 6-axis Ned2 robot, the 5V/24V I/O Adapter, the conveyor, and its new I/O module.
What Is the Role of a PLC in an Automated System?
A programmable logic controller, or PLC, plays a central role in an automated cell. It acts as the control system. It receives information, processes it, and sends commands to connected devices.
For example, a sensor can detect the presence of a part on a line. The PLC reads this input. It stops the conveyor, triggers the robot, and restarts the flow once the task is complete.
This logic reflects common industrial practice. In an automated line, the robot usually does not make decisions alone. It performs an action at the right time, based on commands sent by the control system.
This is an important teaching point. In standalone robotics, students often program the robotic arm as if it controlled the whole environment. In automation, they learn a different logic. The robot becomes one component within a larger architecture.
The Automation Pack helps students understand this shift. The PLC becomes the system controller. It coordinates the robot, conveyor, sensors, and actuators.
Students learn how to reason in industrial cycles. They define start conditions, actions, feedback signals, waiting states, and end-of-cycle conditions.
This realistic approach prepares students for careers in industrial automation, maintenance, industrial robotics, and system integration for Industry 4.0 environments.
Connecting a Robot to a PLC
Connecting an educational robot to an industrial PLC often creates a technical challenge. The electrical signal levels are not always compatible.
Compact robots often use 5V signals. Industrial PLCs, sensors, and production equipment usually use 24V signals. A direct connection can therefore be impossible, unstable, or risky.
The Automation Pack gives instructors a practical way to overcome this challenge. Thanks to the included I/O Adapter, the Ned2 robot can communicate with a 24V industrial environment.
This interface helps avoid unnecessary relays, intermediate boards, and custom wiring. It simplifies implementation and helps protect the hardware.
Students can focus on what matters most: programming the PLC, managing variables, and synchronizing automation cycles.
Robot-to-PLC communication enables many practical lab scenarios:
- Triggering a robot cycle from a PLC,
- Synchronizing a robot with a conveyor,
- Using a 24V sensor to validate a position,
- Managing cycle start, reset, and end-of-cycle signals,
- Controlling a complete automated workflow.
These exercises develop a key skill: understanding how equipment communicates inside an industrial automation architecture.
Why the Conveyor I/O Module Matters
The conveyor I/O module connects the conveyor directly to the PLC control logic.
In this setup, the conveyor is no longer a simple accessory for the Ned2 robot. It becomes a controllable component of the automated cell. The PLC can start it, stop it, or coordinate its behavior with the robot.
This function is essential for teaching flow management. In an automated line, a part must arrive at the right place at the right time. The robot only works when the conveyor, sensors, and PLC are properly synchronized.
The I/O module helps instructors create realistic scenarios around several key concepts:
- Presence detection,
- Actuator control,
- Automated sequences,
- Timing,
- Robot-conveyor synchronization,
- Machine state management.
Students understand that an automated system relies on constant coordination. This logic is at the heart of industrial automation with PLC control.
Key Strengths of the Automation Pack
The Automation Pack bridges the gap between classroom theory and industrial reality.
It combines the Discovery Bundle, which includes the Ned2 robot, a conveyor, a vision kit, and several grippers, with the I/O Adapter, the conveyor I/O module, PLC interfacing guides through NiryoAcademy, and an introductory robotics course.
Its first strength is educational progression. Students first discover robotics with Ned2, including programming and robot motion. Once they have built this foundation, they can move on to more advanced scenarios, integrating the robot into a PLC-controlled workflow.
The second strength is 5V/24V interfacing. The pack addresses a common challenge in educational labs: connecting compact robots with industrial equipment.
The third strength is modularity. Many schools, colleges, and training centers already own PLCs, sensors, and 24V equipment. The Automation Pack fits seamlessly into existing classroom and training environments.
This is why the Automation Pack does not include a PLC. It helps institutions avoid paying for redundant equipment. This way, instructors can keep using the PLC brands and teaching environments they already know.
The fourth strength is ease of deployment. The Automation Pack standardizes connections and reduces the risks of complex wiring. Students can focus more quickly on core automation skills.
Finally, its competitive price makes the Automation Pack even more accessible for education programs. By focusing on essential equipment, NIRYO offers the Automation Pack at €7,150 excluding tax, which represents a 14.81% discount compared with purchasing the components separately.
What Do Students Learn?
The Automation Pack helps students develop skills directly connected to industrial careers.
With the equipment included in the Discovery Bundle, students first learn to identify the components of an automated system. They understand the role of the robot, conveyor, sensors, PLC, and I/O interfaces.
Using the provided tutorials, they then learn how to program control logic. The PLC becomes the decision-making center. Students must structure their program, define trigger conditions, and organize each step of the cycle.
They also work on synchronization, which is an essential skill. Students learn that programming the robot is not enough: its actions must also be coordinated with the conveyor and sensors.
Moreover, students can use the pack to practice troubleshooting activities. Learners must understand why a sequence does not start, why an output does not activate, or why a condition remains false.
This is especially important for industrial maintenance training. It develops a clear method: observe, test, isolate the fault, and correct it.
Students gain a more realistic view of robotics. They no longer see a robotic arm only as a motion tool. They understand it as a component designed to fit into a complete, controllable, and maintainable system.
This way, instructors can adapt exercises to each group’s level and learning pace. Beginners can work on simple cycles. More advanced students can integrate sensors, machine states, intentional errors, or multi-equipment scenarios.
Which Educational Programs Can Benefit from the Automation Pack?
The Automation Pack helps technical, industrial, and career-focused education programs teach practical industrial automation.
The Automation Pack helps robotics, mechatronics, electrical engineering, industrial maintenance, advanced manufacturing, automation technology, and industrial systems programs teach practical automation skills.
It can support hands-on labs in community colleges, technical colleges, vocational schools, engineering schools, and university programs.
This pack is also relevant for workforce development centers and career and technical education programs. As a result, instructors can reproduce workshop-like situations while keeping the setup suitable for classroom and lab environments.
High schools and technical programs can use it to build progressive lab activities. Instructors can start with a simple scenario, then enrich the cell as students progress.
In addition, NIRYO provides educational resources for different teaching levels. Some learning paths include several dozen hours of content. These resources are available through the online NiryoAcademy platform.
FAQ
Does the Automation Pack include a PLC?
No. The pack does not include a programmable logic controller. This choice allows institutions to use their own PLCs and avoid purchasing equipment they may already have.
Can I connect 24V industrial sensors to the Automation Pack?
Yes. The pack allows users to connect 24V sensors or third-party machines through the I/O Adapter and the conveyor I/O module.
What is the difference between the Automation Pack and the Integration Pack?
The Integration Pack focuses on integrating a Ned3 Pro into an educational production line. It includes the I/O Adapter and the Player One HMI box.
The Automation Pack focuses more on learning PLC control with the Ned2 robot, the conveyor, and I/O interfaces.
Is the pack suitable for beginners?
Yes. The Automation Pack includes the Discovery Bundle and an introductory robotics course. This way, students first build a solid foundation before moving on to industrial automation scenarios.
Which industrial automation use cases can you create with the Automation Pack?
Relevant use cases include robot-conveyor synchronization, PLC-triggered robot cycles, 24V sensor integration, automated sequence management, and basic troubleshooting exercises.


